
As service architecture evolves, new services may join your enterprise services landscape. The question, “Which service is authorized to run operations in the backend?” needs to find an answer. Managing authorization on protected resources without sharing user credentials on whose behalf the operation is being executed, among all services, becomes crucial, but I doubt it is a trivial task. Thus, understanding OAuth 2.0 to manage authorization and control user access to REST resources is essential to enterprise application development. Fortunately, there are frameworks like Spring Security - and Spring-Security-OAuth in Java stack, which provide a solid foundation, that simplifies this task, but still, integration of authorization framework in an enterprise application might be tedious work. Our goal in this article will be to understand the fundamental concepts of the OAuth 2.0 protocol and the step-by-step implementation of a backend with its components.
Before we get started with OAuth, I briefly want to brush up on the topic first, “Authentication, Authorization and Access Control”. Authentication verifies your identity. It is the same procedure if you show your ID to authorities so that they are able to know who they are talking to. Authentication by Username/Password pair (and along with 2FA) is a broadly adopted method today. Authorization is there to ensure that access is authorized to the requestor, who has already been authenticated for example if you possess a driver’s license, you are authorized to drive a car, while access control does manage the permissions/privileges.
OAuth 2.0 in a Nutshell
OAuth 2.0 is an authorization protocol standardized under RFC 6749 within the IETF as an open standard. Its purpose is to specify user-and-client authorization on protected resources without sharing credentials. The roles defined in OAuth are:
Resource owner, that is, the end-user who owns resources of interest that is hosted by the resource server, the client, the application which claims access to the resource owner’s (user’s) protected resources and performs some operations on behalf of the user and authorization server which manages user and client authentication and authorization by exchanging user credentials with authorization code and access tokens. The client initiates the authorization workflow, that is, the application requesting access to the resource owner’s resources on behalf of a user, e.g., a mobile app. The resource server is the server that hosts the protected resources. It only accepts requests with a valid access token. The authorization server is the one which issues access tokens (and authorization codes depending on the grant type) to the clients after successful authentication.
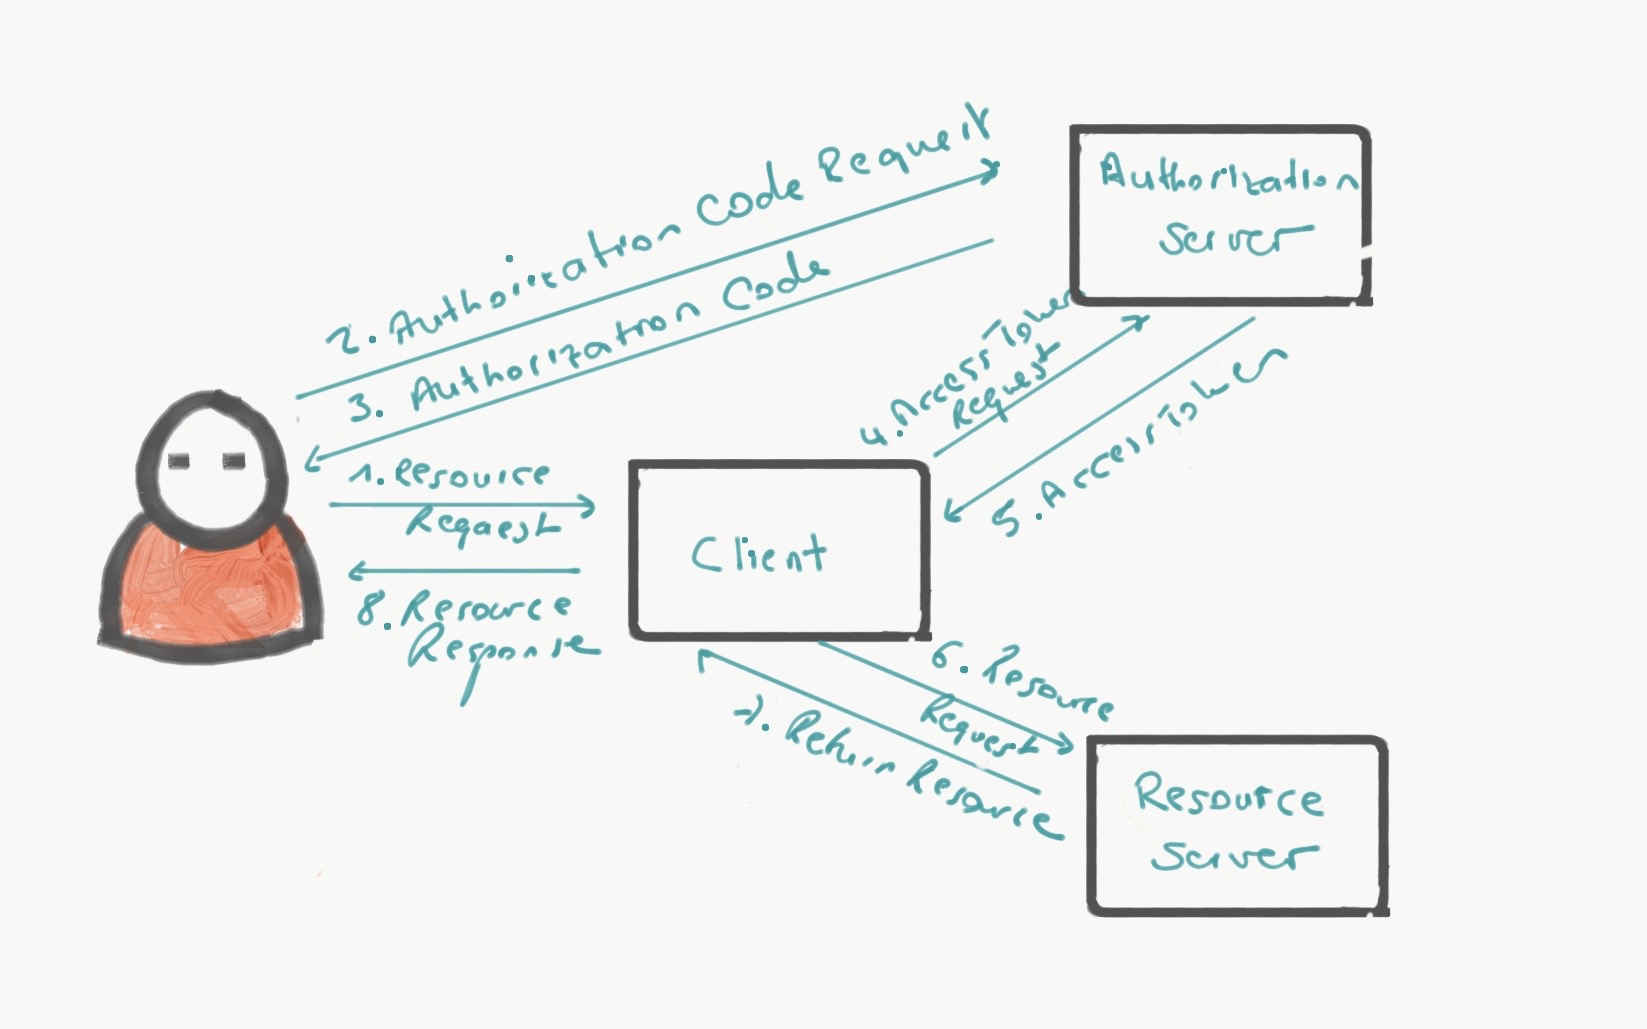
Figure - 1: OAuth 2.0 Workflow with grant type “authorization code”
Access Token
Access tokens are credentials, that are issued to clients by authorization server, allowing them to access protected resources. Access tokens are valid till they expire and may be effective in a pre-defined scope, in which the client is allowed to operate e.g read-scope, read-write scope, private scope, etc. By using access tokens in client and server communication, we eliminate the need of sharing resource owner’s credentials, so client applications like mobile apps do not need to memorize user’s credentials, at all.
The other token type is the refresh token. Refresh token is only used to obtain a new access token before the access token expires. Once a client application is authorized, there is no need to re-authenticate the user, everytime the access token expires if it has a refresh token. In this case, the client may use the refresh token that is returned from the authorization server along with the access token to obtain a new access token from the authorization server.
Authorization Grants
In OAuth 2.0 world, the main motivation is, “Do not share user’s credentials with clients”. The application, that is the client, may be a native one to OS, or some JavaScript application that is run by browser. Depending on the degree of the trust between client and user, the client application may ask user’s credentials to obtain access token from authorization server without having an intermediate step as grant type “Resource Owner Password Credentials”. It requires, however, a higher degree of trust. Although the client is allowed to access user credentials over a short period of time, till it receives an access token from the authorization server.
On the other hand, the client might be another web service, and in this case the user will be redirected to the authorization server with a client id, an optional scope parameter and a redirection URI so that the user is able to authenticate on their own. A real-life example for this authentication flow is “Facebook integration” on Twitter. Twitter, the client, needs access to protected resources to post your recent tweets on your Facebook timeline. After a successful authentication process against Authorization Server, Facebook, the request will be redirected to the clients redirection URI (to Twitter) with an authorization code with which the client can request an access token from Authorization Server. In this “authorization code” grant, the client access to the user credentials is not permissible.
There are two more authorization grants, the “implicit” and the “client credentials”. In the implicit workflow, the user-agent has to be redirected to the client with an access token, instead of using an auth code and without requiring the client to get authenticated with an auth code. Yor are probably familiar with this grant type from JavaScript web applications. Moreover, authorization-grant with “client credentials” requires the client to authenticate itself with its own credentials. This type of authorization grant is useful, in case, the client is the resource owner and defines the scope of access.
Scopes
Scope defines the boundaries of the authorization request. The authorisation server may enforce the clients to specify the scope while requesting access token in which scope the access token should be effective. RFC 6749 3.3 Even though scopes are optional, they are essential in workflows and we will revisit them later.
In the next section, we are going to integrate these foundations with implementation so that resource owners are able to access their resources while unauthorized access can be denied. To do this, we use Spring framework which provides an annotation-based programming model to incorporate OAuth 2.0 concepts with services declaratively.
Building the Backend
So far we have covered the groundwork about OAuth 2.0, that is required to understand the concepts which we use to build our authorization and authentication backend. Next step, we are going to start creating the components like Authorization Server, Resource Server, and so on. The backend, I am giving as example here, is part of a hypothetical book webshop so as to store book reviews. It means, there will be users who require access to write some reviews while other users will only need read access to view the reviews.
The sample application, we are building here, is a Spring Boot Application so we can start the container either by running the Spring Boot Maven plugin in the command line or as Java executable by running the main method, e.g, in an IDE - another approach would be by hitting java jar command if the application has already been packaged in JAR file. Moreover, the application is backed by a MySQL database so that the user credentials can be persisted. I am going to set up a docker container environment to start the entire back-end on my local computer. Dockerization will speed up “development and test cycle” and once we decide to deploy our back-end, it is much easier to roll the services out onto a container orchestration platform like Mesos or Kubernetes.
To build the backend, we will create a new Maven project from scratch while adding Spring Boot parent into the project’s POM which ensures the right versions of dependencies get included. For the sake of ease, I will create a single project which includes both the Resource and the Authorization Server in the same application, but in production, you may want to split them into two separate services, depending on the scale. For this purpose, I used the Maven simple project archetype and the files are organized in classical Maven project structure, i.e we have the Java packages in src/main/java and resources like configurations, etc. in src/main/resources source directories.
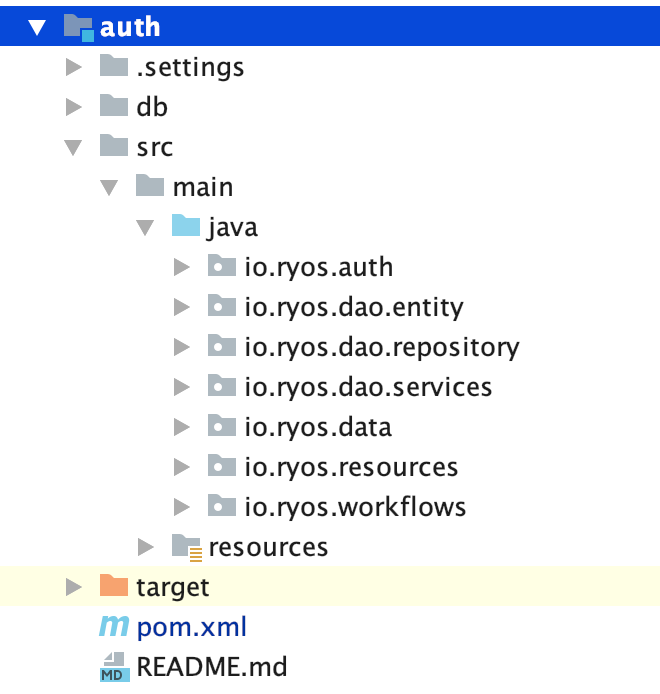
Figure - 2 : Project’s structure
The Figure 2 demonstrates the project structure we will work on throughout this article. I organized the classes in packages as follows: io.ryos.auth is for Spring Boot application classes and configurations.io.ryos.dao contains the classes for persistence layer, e.g entities, repositories (of Data Access Layer). io.ryos.data has some value objects like UserProfile as a representation of the user file. io.ryos.resources is where REST resources are located and the resources source directory to keep classpath files like configurations, properties-files, etc. The project’s POM resides in the root directory along with docker-compose.yml. The POM includes the Spring Boot’s starter parent:
    <parent>
        <groupId>org.springframework.boot</groupId>
        <artifactId>spring-boot-starter-parent</artifactId>
        <version>${spring.boot.version}</version>
        <relativePath />
    </parent>
Example - 3 : Parent POM.
We will also need the following dependencies to enable the Spring Framework in the project and some more dependencies mostly pertaining to Java persistence and MySQL driver:
    <dependencies>
        <dependency>
            <groupId>org.springframework.boot</groupId>
            <artifactId>spring-boot-starter-web</artifactId>
        </dependency>
        <dependency>
            <groupId>org.springframework.boot</groupId>
            <artifactId>spring-boot-starter-security</artifactId>
        </dependency>
        <dependency>
            <groupId>org.springframework.security.oauth</groupId>
            <artifactId>spring-security-oauth2</artifactId>
        </dependency>
        <dependency>
            <groupId>org.springframework.boot</groupId>
            <artifactId>spring-boot-starter-data-jpa</artifactId>
        </dependency>
        <dependency>
            <groupId>mysql</groupId>
            <artifactId>mysql-connector-java</artifactId>
        </dependency>
        <dependency>
            <groupId>javax.persistence</groupId>
            <artifactId>persistence-api</artifactId>
        </dependency>

        <dependency>
            <groupId>org.springframework.boot</groupId>
            <artifactId>spring-boot-starter-test</artifactId>
            <scope>test</scope>
        </dependency>
    </dependencies>
Example - 4 : Project’s POM file.
Note that, the first annotation, ➊ @SpringBootApplication, enables Spring Boot application and it takes an attribute, “scanBasePackages” with a list of package names in which Spring framework has to search for annotated Spring components and instantiate them. ➋ The @EnableJpaRepositories is similar to @SpringBootApplication. It enables the Java Persistence (JPA), that is required to build the persistence layer. ➌ The third annotation is the @EnableTransactionManagement which enables annotation-based Java transaction management (JTA). And the last annotation, ➍ @PropertySource defines the name of the configuration file in the classpath:
@SpringBootApplication(scanBasePackages={"io.ryos"}) ➊
@EnableJpaRepositories(basePackages={"io.ryos"}) ➋
@EnableTransactionManagement ➌
@PropertySource("version.properties") ➍
public class Application {

    private static final String CONN_URL =
        "jdbc:mysql://localhost:3306/ryos_auth?useUnicode=true&characterEncoding=UTF-8";

    private static final String SQL_DIALECT =
        "org.hibernate.dialect.MySQL5InnoDBDialect";

    @Qualifier("dataSource") ➎
    @Autowired
    private DataSource dataSource;

    @Bean
    public DataSource dataSource() { ➏
        DriverManagerDataSource dataSource = new DriverManagerDataSource();
        dataSource.setDriverClassName("com.mysql.jdbc.Driver");
        dataSource.setUrl(CONN_URL);
        dataSource.setUsername("root");
        dataSource.setPassword("p@ssw0rd");
        return dataSource;
    }

    private Properties jpaProperties() { ➐
        Properties properties = new Properties();
        properties.put("hibernate.dialect", SQL_DIALECT);
        properties.put("hibernate.show_sql", "true");
        return properties;
    }

    @Bean
    public LocalContainerEntityManagerFactoryBean entityManagerFactory() { ➑
        HibernateJpaVendorAdapter vendorAdapter = new HibernateJpaVendorAdapter();
        vendorAdapter.setDatabase(Database.MYSQL);
        vendorAdapter.setGenerateDdl(true);
        vendorAdapter.setShowSql(true);
        LocalContainerEntityManagerFactoryBean factory =
            new LocalContainerEntityManagerFactoryBean();
        factory.setJpaVendorAdapter(vendorAdapter);
        factory.setPackagesToScan("io.ryos.dao.entity");
        factory.setDataSource(dataSource());
        factory.setJpaProperties(jpaProperties());
        return factory;
    }

    public static void main(String[] args) { ➒
        SpringApplication.run(Application.class, args);
    }
}
Example - 5 : Application class.
With the “dataSource” bean configuration ➎ a data source is configured, that is how the application does reach the database ➏. Spring makes the data source class-wide available. ➐ jpaProperties is a helper method which provides required properties for JPA. ➑ “entityManagerFactory” method is a Java-based bean configuration, that is employed to instantiate EntityManagerFactory instance, that is the gateway to the persistence context where the entities and their life-cycles are managed. Finally, ➒ is the main method to start the Spring Boot application.
The first component we create is the Authorization Server. I will put all application components into a single Spring Boot project for the sake of ease. But, in a real-life application, you probably need to consider to separate the applications, the authorization and resource server. But, before we begin with Authorization and Resource Server, first, we will set up web security. Fortunately, Spring provides configurer adapter classes that need to be inherited while implementing configure() methods.
@Configuration
public class WebSecurityConfiguration extends WebSecurityConfigurerAdapter {

    @Autowired
    @Qualifier("userRepositoryService")
    private UserDetailsService userDetailsService; ➊

    @Override
    protected void configure(AuthenticationManagerBuilder auth)
            throws Exception {
        auth.userDetailsService(userDetailsService); ➋
    }

    @Override
    @Bean(name="authenticationManagerBean")
    public AuthenticationManager authenticationManagerBean()
            throws Exception {
        return super.authenticationManagerBean(); ➌
    }

    @Override
    protected void configure(HttpSecurity http) throws Exception {
        http.csrf().disable() ➍
                .authorizeRequests().antMatchers("/login").permitAll().and() ➎
                .authorizeRequests().anyRequest().hasRole("USER"); ➏
    }
}
➊ Please note that, we inject userDetailsService, the service component, that is used to access database to read user data. ➋ The userDetailsServer reference is passed to the Authentication Manager so that it is able to know how to access user database. ➌ We create an authentication manager bean. With ➍, we configure web security and its boundaries. By default, the security rules apply to all requests, but we can also define matchers to tell the framework on which resources what kind of rules are going to be effective in runtime e.g in ➎ and ➏ we permit all request targeting /login while requiring to have the role “USER”.
Authorization Server
As we saw earlier, authorization server is the component where tokens are issued to the clients. Implementing an Authorization Server with Spring, is simply to add another Bean configuration into the project. The bean configuration for the authorization server extends AuthorizationServer- ConfigurerAdapter and is annotated with @EnableAuthorizationServer which is necessary to enable the authorization server component. There are two other Spring components get injected via @Autowired, the authenticationManager and the userDetailsService. The latter is the repository and DAO indicating how Spring framework accesses the user data in database and the former is authenticationManager.
@Configuration
@EnableAuthorizationServer
public class AuthorizationServerConfiguration extends AuthorizationServerConfigurerAdapter {

    @Autowired
    @Qualifier("authenticationManagerBean")
    private AuthenticationManager authenticationManager;

    @Autowired
    @Qualifier("userRepositoryService")
    private UserDetailsService userDetailsService;

    @Override
    public void configure(AuthorizationServerSecurityConfigurer oauthServer) throws Exception {
        oauthServer.tokenKeyAccess("permitAll()").checkTokenAccess("isAuthenticated()"); ➊
    }

    @Override
    public void configure(ClientDetailsServiceConfigurer clients) throws Exception {

        clients.inMemory() ➋
                .withClient("ryosApp") ➌
                .secret("abc123")
                .scopes("world") ➍
                .authorizedGrantTypes("password", "refresh_token") ➎
                .resourceIds("resource");
    }

    @Override
    public void configure(AuthorizationServerEndpointsConfigurer endpoints)
            throws Exception {
        endpoints.tokenStore(tokenStore()) ➏
                .authenticationManager(authenticationManager)
                .userDetailsService(userDetailsService);
    }

    @Bean
    public TokenStore tokenStore() {
        return new InMemoryTokenStore(); ➐
    }
}
The bean configuration for the authorization server extends an adapter class, “AuthorizationServer- ConfigurerAdapter” and it is annotated with @EnableAuthorizationServer which enables the authorization server throughout the application. There are two other Spring components which get injected by @Autowired, the authenticationManager and the userDetailsService. The latter is the instance to the repository and DAO which helps us in accessing the user data and the former is authenticationManager.
Let us stick with the AuthenticationManager a bit, first, the interface with the authenticate() method. The implementation of AuthenticationManager, the ProviderManager is responsible to authenticate the request by iterating over authentication providers. It is technically hooked up to the security servlet filters and does process requests before they reach any REST resources. If AuthenticationManager is successful, it returns a non-null response that indicates that the request is authorized. If none of the providers returns a non-null response, then the request will end up with an AuthorizationException.
In “AuthorizationServerConfiguration”, we define three overloaded configure() methods, ➊ taking a AuthorizationServerSecurityConfigurer as parameter. It configures security rules for Authorization Server, for instance, permit all requests to the endpoint through which access tokens are issued while requiring authorized access on the token endpoint. In the second configure method, ➋ we set up the Client Details Service - just like user details service, it is responsible for providing information about the client. We use in our example an in-memory service with a single static client ➌ “ryos” and its secret, ➍ with read and write scopes and grant types ➎ “password” and “refresh_token”. With ➏, we hand the token store, authentication manager, and the user details service over to the authentication server endpoint configurer. ➐ As token store, we use also an in-memory store provided by the framework.
Resource Server
It is now time to set up the resource server. In resource server configuration, we do not have that much. The configuration bean is annotated with @EnableResourceServer while extending ResourceServer- ConfigurerAdapter class, provided by the framework. The bean configuration overrides the configure method and defines the resource id.
@Configuration
@EnableResourceServer
public class ResourcesServerConfiguration extends ResourceServerConfigurerAdapter {

    @Override
    public void configure(ResourceServerSecurityConfigurer resources) {
        resources.resourceId("resource");
    }

    @Override
    public void configure(HttpSecurity http) throws Exception {
        http.authorizeRequests().antMatchers("/version").authenticated();
    }
}
In the overloaded configure()- method which takes the HttpSecurity parameter, HttpSecurity instance is configured while requiring the requests having authorized on matching resource “/version” and having authenticated.
The REST Resource
The API’s REST resource which is handling the review requests looks like as follows:
@Controller
@RequestMapping("/reviews") ➊
public class HelloResource {

    @Autowired
    private BookReviewService bookReviewService; ➋

    @RequestMapping(method = RequestMethod.GET)
    public @ResponseBody
    ResponseEntity showReview(
        final @QueryParam("isbn") String isbn
        final Principal principal) { ➌
        return bookReviewService.getReview(isbn);
    }
}
➊ The REST resource handler accepts GET requests targeting to /reviews API endpoint. The response object that is returned from the BookReviewService ➋ of which instance is injected to the resource by Spring’s IoC container. ➌ The resource handler method showReview does, in addition, declare an argument, Principal which contains the security context, about that we talk later and an HTTP query parameter “isbn” ISBN number of the book.
Testing
We can test the authorization server by making requests, for instance, with cURL and ask for an access token as well as refresh token:
curl ryosApp:abc123@localhost:9000/oauth/token \
   -d username=bagdemir  \
   -d password=123456 \
   -d grant_type=password
the response,
{
    "access_token": "93e8733e-022b-4387-abf5-79974323e7f5",
    "token_type": "bearer",
    "refresh_token": "0fbfc23c-5f1d-4c13-afbd-7c2144122ed2",
    "expires_in": 43199,
    "scope": "read write"
}
Once we acquired the access token, we now are able to access protected resources. But first, let me try to call the REST resource with the access token:
curl -X GET http://localhost:9000/version
and the result,
{
    "error": "unauthorized",
    "error_description": "Full authentication is required to access this resource"
}
As you can see, we may not access the protected resource without providing an access token. In the next example request, we provide the access token in the Authorization header as bearer:
 curl -X GET http://localhost:9000/version \
    -H "Authorization: Bearer 32f3f08e-e124-444b-bfc4-55bd559b44a7"
and the result,
{
    "versionInfo": 1,
    "buildInfo": "1",
    "releaseDateStr": "12.04.2018"
}